what it looks like now
Showing posts with label science. Show all posts
Friday, 19 June 2020
Friday, 5 June 2020
science
in science we have started our corrosion experiment with nails that are rusting and non rusting.
we set up 8 test tubes to show the effects of the rusting and non rusting.
invetagteing rusting
1nail +h20
2nail+ salt water
3nail+ boiling water and oil
4nail
5nail+ nail polish
6nail+calcium
7nail + vasaline
8nail + magnesium
we set up 8 test tubes to show the effects of the rusting and non rusting.
invetagteing rusting
1nail +h20
2nail+ salt water
3nail+ boiling water and oil
4nail
5nail+ nail polish
6nail+calcium
7nail + vasaline
8nail + magnesium
Saturday, 6 April 2019
science
here is a photo of what we have done so far we had to grab paper put dots on it and put it in a beaker with 50 gm of water in it then we are waiting for the change in the water here is a new photo.
the purple moved to the top of the paper and got darker also the pen was there to keep the paper in place.
Monday, 25 February 2019
my shoe and height in 2018
Name
|
Shoe size
|
Hight
|
phillip (me)
|
27cm
|
1m 58cm
|
Michaela
|
28cm
|
1m 63cm
|
flight aerodynamics
Aim:To look at the 4 main forces of flying and how these can be overcome.
findings:
Plane type
|
How does it behave?
|
Time ( secs)
|
Paper sheet, drop
| weirdly | 1.35 seconds |
Paper with fold down middle, drop
| strange | 4.08 seconds |
Paper with fold and 1 paper clip, drop
| ||
Fold, 2 clips, rudder, drop
| ||
Fold, 2 clips, rudder throw
|
Thursday, 24 May 2018
kite
Kites
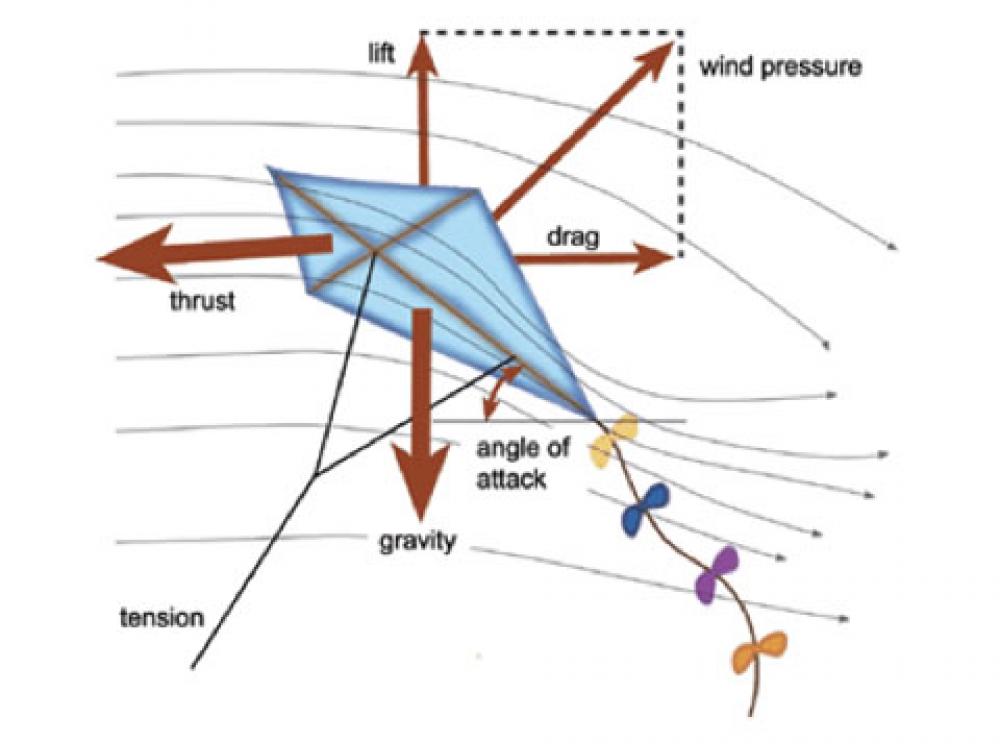
Aim: To look at a kite and how we can overcome the 4 forces of flight.

Write a definition about the following types of kites and find a picture of them that you can upload to your blog.
Forces of flight with Kites
Force
|
Increase / decrease
|
How do we do this when making a kite?
|
Drag
| decrees | we need to make sure its pointed, we need to make sure its angled correctly to the wind |
Lift
| incres | longer string,forced into the wind |
Gravity
| decrees | we make it streamline, make it with light materials |
Thrust
| incerees | strong, steady wind |
Write a definition about the following types of kites and find a picture of them that you can upload to your blog.
- The Sled Kite.
- The Diamond Kite.
- The Barn Door Kite.
- The Sode Kite.
- The Delta Kite.
Name 5 types of kites that were used in China?
Name sports that use kites?
Thursday, 10 May 2018
roket
2-liter soft drink bottle (1 per team) Styrofoam food trays Poster Board, cardboard Masking tape Low-temperature glue guns and glue 1- to 2-inch piece of 1/2” PVC pipe 4X4X1-inch board (per team) and small screw and washer 4 ounces of clay Eye protection Plastic grocery sacks or thin fabric scraps String Sandpaper or emery boards Art supplies Water rocket launcher rocket fuel Bicycle pump or small compressor
Rocket Activity Water Rocket Construction Objective Student teams will construct water rockets and successfully launch them. Description Using plastic soft drink bottles, cardboard or Styrofoam food trays, tape, and glue, small teams of students design and construct rockets. A simple assembly stand assists them in gluing fins on their rockets, and a nose cone is mounted on the top. A small lump of modeling clay is inserted into the nose cone to enhance the rocket’s stability in flight. The rocket is launched with a special launcher. The plans for the launcher are found in the Water Rocket Launcher activity. National Science Content Standards Physical Science • Position and motion of objects • Motions and forces Science and Technology • Abilities of technological design National Mathematics Content Standards • Geometry • Measurement National Mathematics Process Standards • Connections Materials 2-liter soft drink bottle (1 per team) Styrofoam food trays Posterboard, cardboard Masking tape Low-temperature glue guns and glue 1- to 2-inch piece of 1/2” PVC pipe 4X4X1-inch board (per team) and small screw and washer 4 ounces of clay Eye protection Plastic grocery sacks or thin fabric scraps String Sandpaper or emery boards Art supplies Water rocket launcher (see page 109) Bicycle pump or small compressor 115 Management Begin collecting 2-liter soft drink bottles a few weeks before the activity. Save the caps, too. Rinse the bottles and remove the labels. There will be some glue adhesive remaining on the bottle. Goo remover can be used to clean it off, but it tends to smear the surface. Construct assembly stands out of small blocks of wood. Attach a bottle cap to the middle of each board with a small screw and a washer through the cap. When students begin constructing their rockets, they screw the bottle neck into the cap, and the board below will hold the rocket upright for gluing. The blocks also make a convenient way of storing the rockets upright when not being worked on. Make mounting stands by screwing the plastic bottle caps to a board. Use a washer for added strength. Pre-cut the PVC segments. The cuts can be slanted to streamline them. A saw or PVC cutter is used for cutting. The segments act as launch lugs to guide the rocket up the launch rod during the first moments of the rocket’s skyward climb. Be sure to use lowtemperature glue guns. Hightemperature guns will melt the plastic bottle. A small dish of ice water in a central location is helpful for students who get hot glue on their fingers. Immersing the fingers will immediately chill the glue. Do not put bowls of water near the guns themselves because the guns use electricity for heating, and shorting could occur if they get wet. Special Note The activity entitled Project X-51 (see page 118) lays out an entire process for Launch lug with slanted cuts. constructing water rockets through launch and reporting. Student teams form rocket companies and compete for government contracts. The procedures that follow here should be used for the construction phase of Project X-51. Background A water rocket is a chamber, usually a 2-liter soft drink bottle, partially filled with water. Air is forced inside with a pump. When the rocket is released, the pressurized air forces water out the nozzle (pour spout). The bottle launches itself in the opposite direction. The bottle usually has a nose cone for streamlining and fins for stability. Water rockets are easily capable of 100-meter-high flights, but advanced hobbyists have combined bottles and staged bottles for flights over 300 meters high. Water bottle rockets are ideal for teaching Newton’s laws of motion. The launch of the rocket easily demonstrates Newton’s third law. Students can see the water shooting out of the nozzle (action) and see the rocket streak into the sky (reaction). Students can also experiment with different pressure levels inside the chamber and different amounts of water. The rocket will not fly very high if it is filled only with air. The air will quickly rush out during the launch, but its mass is very low. Consequently, the thrust produced is also low (Newton’s second law). By placing water in the bottle, the air has to force the water out first before it can leave the bottle. The water increases the mass expelled by the rocket, thereby increasing the thrust. Like all rockets, the flight performance of water bottle rockets is strongly influenced by the rocket’s design and the care taken in its construction. Beveling the leading and trailing edges of fins allows them to slice through the air more cleanly. Straight-mounted fins produce little friction or drag with the air. A small amount of ballast weight inside the nose cone helps balance the rocket. This moves the center of mass of the rocket forward while still leaving a large fin surface area at the rear. In flight, the rocket design acts like a weather vane, with the nose cone pointed up and the fins down. Procedure 1. Set up a supply station with materials such as Styrofoam food trays, posterboard, tape, sandpaper, and art supplies. 2. Set up a gluing station with several heated low-temperature glue guns and extra glue sticks. 3. Divide students into teams for constructing rockets. If using Project X-51, describe the project to them and explain its objectives. Discuss construction techniques for their rockets. Give each team an assembly stand and a 2-liter soft drink bottle. Project X-51 requires teams to keep track of the materials they used. Even if they are not doing the project, it is still good for teams to account for the materials used. 4. Show teams how to use the glue guns and point out the cold water dish in case glue gets on fingers. Students should wear Eye protection when gluing. 5. Describe how fins can be smoothed with sandpaper to slice through the air with little drag. 6. Remind teams to add clay to the inside of their nose cones. Trim fin edges with sandpaper to give them knife-blade shapes to slice through the air. 7. Have teams glue launch lugs to the side of the rocket midway up the body of the rocket and position it midway between two fins. 8. Challenge teams to think up a way to add a parachute to their rockets for soft landings. Plastic grocery bags or lightweight fabric scraps can be cut to make parachutes and strings can be used to attach them. The nose cone must remain in place until the rocket reaches the top of its flight; then it should open and release the9. When the rockets have been completed, have teams qualify their rockets for flight by conducting string tests. Using several feet of string, tie the rocket around the middle so that it balances. Because of the nose cone weight, the balance point will be towards the nose. When the rocket hangs level, a small piece of tape should be temporarily fixed to the string and bottle to keep the string from slipping. The rocket is then twirled in a circle. If the rocket tumbles while circling, it is not stable and needs more nose cone weight, bigger fins, or a combination of both. If the rocket circles with the nose always pointed forward, it is stable and ready for flight. (More information about string tests will be found in the instructions for Project X-51.) 10. Review launch procedures with the teams. The instructions are outlined in the activity for constructing a water rocket launcher (see page 109). Conduct an inspection the day before the launch to ensure that rocket fins are securely attached. 11. Set up a tracking station for measuring the altitudes achieved by the rockets. Follow all safety procedures and instructions when launching the team rockets. Assessment • Inspect each team’s rocket for the construction skill employed. Fins should be vertical and securely attached. The rocket should be stable. • Observe the flights and note how the recovery system designed by teams worked. Extensions • Conduct a space art show to feature decorating schemes of team rockets. Have students draw artist’s conceptions of their rockets in flight. (See The Art of Spaceflight on page 146). To view artist’s conceptions of NASA’s new Constellation program, see pages 13-17. 10. Review launch procedures with the teams. The instructions are outlined in the activity for constructing a water rocket launcher (see page 109). Conduct an inspection the day before the launch to ensure that rocket fins are securely attached. 11. Set up a tracking station for measuring the altitudes achieved by the rockets. Follow all safety procedures and instructions when launching the team rockets.
2-liter soft drink bottle (1 per team) Styrofoam food trays Posterboard, cardboard Masking tape Low-temperature glue guns and glue 1- to 2-inch piece of 1/2” PVC pipe 4X4X1-inch board (per team) and small screw and washer 4 ounces of clay Eye protection Plastic grocery sacks or thin fabric scraps String Sandpaper or emery boards Art supplies Water rocket launcher (see page 109) Bicycle pump or small compressor Bubbles will continue to form on the porous surface and the process will repeat, creating a nice foamy result. In addition to that, the gum arabic / gelatin ingredients of the Mentos, combined with the potassium benzoate, sugar or (potentially)aspartame, in Diet sodas, also help in this process.
Rocket Activity Water Rocket Construction Objective Student teams will construct water rockets and successfully launch them. Description Using plastic soft drink bottles, cardboard or Styrofoam food trays, tape, and glue, small teams of students design and construct rockets. A simple assembly stand assists them in gluing fins on their rockets, and a nose cone is mounted on the top. A small lump of modeling clay is inserted into the nose cone to enhance the rocket’s stability in flight. The rocket is launched with a special launcher. The plans for the launcher are found in the Water Rocket Launcher activity. National Science Content Standards Physical Science • Position and motion of objects • Motions and forces Science and Technology • Abilities of technological design National Mathematics Content Standards • Geometry • Measurement National Mathematics Process Standards • Connections Materials 2-liter soft drink bottle (1 per team) Styrofoam food trays Posterboard, cardboard Masking tape Low-temperature glue guns and glue 1- to 2-inch piece of 1/2” PVC pipe 4X4X1-inch board (per team) and small screw and washer 4 ounces of clay Eye protection Plastic grocery sacks or thin fabric scraps String Sandpaper or emery boards Art supplies Water rocket launcher (see page 109) Bicycle pump or small compressor 115 Management Begin collecting 2-liter soft drink bottles a few weeks before the activity. Save the caps, too. Rinse the bottles and remove the labels. There will be some glue adhesive remaining on the bottle. Goo remover can be used to clean it off, but it tends to smear the surface. Construct assembly stands out of small blocks of wood. Attach a bottle cap to the middle of each board with a small screw and a washer through the cap. When students begin constructing their rockets, they screw the bottle neck into the cap, and the board below will hold the rocket upright for gluing. The blocks also make a convenient way of storing the rockets upright when not being worked on. Make mounting stands by screwing the plastic bottle caps to a board. Use a washer for added strength. Pre-cut the PVC segments. The cuts can be slanted to streamline them. A saw or PVC cutter is used for cutting. The segments act as launch lugs to guide the rocket up the launch rod during the first moments of the rocket’s skyward climb. Be sure to use lowtemperature glue guns. Hightemperature guns will melt the plastic bottle. A small dish of ice water in a central location is helpful for students who get hot glue on their fingers. Immersing the fingers will immediately chill the glue. Do not put bowls of water near the guns themselves because the guns use electricity for heating, and shorting could occur if they get wet. Special Note The activity entitled Project X-51 (see page 118) lays out an entire process for Launch lug with slanted cuts. constructing water rockets through launch and reporting. Student teams form rocket companies and compete for government contracts. The procedures that follow here should be used for the construction phase of Project X-51. Background A water rocket is a chamber, usually a 2-liter soft drink bottle, partially filled with water. Air is forced inside with a pump. When the rocket is released, the pressurized air forces water out the nozzle (pour spout). The bottle launches itself in the opposite direction. The bottle usually has a nose cone for streamlining and fins for stability. Water rockets are easily capable of 100-meter-high flights, but advanced hobbyists have combined bottles and staged bottles for flights over 300 meters high. Water bottle rockets are ideal for teaching Newton’s laws of motion. The launch of the rocket easily demonstrates Newton’s third law. Students can see the water shooting out of the nozzle (action) and see the rocket streak into the sky (reaction). Students can also experiment with different pressure levels inside the chamber and different amounts of water. The rocket will not fly very high if it is filled only with air. The air will quickly rush out during the launch, but its mass is very low. Consequently, the thrust produced is also low (Newton’s second law). By placing water in the bottle, the air has to force the water out first before it can leave the bottle. The water increases the mass expelled by the rocket, thereby increasing the thrust. Like all rockets, the flight performance of water bottle rockets is strongly influenced by the rocket’s design and the care taken in its construction. Beveling the leading and trailing edges of fins allows them to slice through the air more cleanly. Straight-mounted fins produce little friction or drag with the air. A small amount of ballast weight inside the nose cone helps balance the rocket. This moves the center of mass of the rocket forward while still leaving a large fin surface area at the rear. In flight, the rocket design acts like a weather vane, with the nose cone pointed up and the fins down. Procedure 1. Set up a supply station with materials such as Styrofoam food trays, posterboard, tape, sandpaper, and art supplies. 2. Set up a gluing station with several heated low-temperature glue guns and extra glue sticks. 3. Divide students into teams for constructing rockets. If using Project X-51, describe the project to them and explain its objectives. Discuss construction techniques for their rockets. Give each team an assembly stand and a 2-liter soft drink bottle. Project X-51 requires teams to keep track of the materials they used. Even if they are not doing the project, it is still good for teams to account for the materials used. 4. Show teams how to use the glue guns and point out the cold water dish in case glue gets on fingers. Students should wear Eye protection when gluing. 5. Describe how fins can be smoothed with sandpaper to slice through the air with little drag. 6. Remind teams to add clay to the inside of their nose cones. Trim fin edges with sandpaper to give them knife-blade shapes to slice through the air. 7. Have teams glue launch lugs to the side of the rocket midway up the body of the rocket and position it midway between two fins. 8. Challenge teams to think up a way to add a parachute to their rockets for soft landings. Plastic grocery bags or lightweight fabric scraps can be cut to make parachutes and strings can be used to attach them. The nose cone must remain in place until the rocket reaches the top of its flight; then it should open and release the9. When the rockets have been completed, have teams qualify their rockets for flight by conducting string tests. Using several feet of string, tie the rocket around the middle so that it balances. Because of the nose cone weight, the balance point will be towards the nose. When the rocket hangs level, a small piece of tape should be temporarily fixed to the string and bottle to keep the string from slipping. The rocket is then twirled in a circle. If the rocket tumbles while circling, it is not stable and needs more nose cone weight, bigger fins, or a combination of both. If the rocket circles with the nose always pointed forward, it is stable and ready for flight. (More information about string tests will be found in the instructions for Project X-51.) 10. Review launch procedures with the teams. The instructions are outlined in the activity for constructing a water rocket launcher (see page 109). Conduct an inspection the day before the launch to ensure that rocket fins are securely attached. 11. Set up a tracking station for measuring the altitudes achieved by the rockets. Follow all safety procedures and instructions when launching the team rockets. Assessment • Inspect each team’s rocket for the construction skill employed. Fins should be vertical and securely attached. The rocket should be stable. • Observe the flights and note how the recovery system designed by teams worked. Extensions • Conduct a space art show to feature decorating schemes of team rockets. Have students draw artist’s conceptions of their rockets in flight. (See The Art of Spaceflight on page 146). To view artist’s conceptions of NASA’s new Constellation program, see pages 13-17. 10. Review launch procedures with the teams. The instructions are outlined in the activity for constructing a water rocket launcher (see page 109). Conduct an inspection the day before the launch to ensure that rocket fins are securely attached. 11. Set up a tracking station for measuring the altitudes achieved by the rockets. Follow all safety procedures and instructions when launching the team rockets.
2-liter soft drink bottle (1 per team) Styrofoam food trays Posterboard, cardboard Masking tape Low-temperature glue guns and glue 1- to 2-inch piece of 1/2” PVC pipe 4X4X1-inch board (per team) and small screw and washer 4 ounces of clay Eye protection Plastic grocery sacks or thin fabric scraps String Sandpaper or emery boards Art supplies Water rocket launcher (see page 109) Bicycle pump or small compressor Bubbles will continue to form on the porous surface and the process will repeat, creating a nice foamy result. In addition to that, the gum arabic / gelatin ingredients of the Mentos, combined with the potassium benzoate, sugar or (potentially)aspartame, in Diet sodas, also help in this process.
Wednesday, 14 March 2018
The case of the Barefoot Burglar
The Crime
At approximately 7:15 a.m., Friday morning, Mrs. King, the science teacher, thought something was fishy
as she walked down the hall and noticed that her door was open. She walked into her classroom and
immediately
discovered that the small aquarium had been broken and her prized gold fish were gasping in the sink.
Beside the broken aquarium were the shattered remains of the pink piggy bank that had been on the shelf
above the aquarium. A can of blue paint was spilled on the floor. Footprints of a barefooted burglar led to
an open window. Bits of a white powdery substance were found next to
the broken, empty, piggy bank. The only other item found was a half-eaten large chunk of chocolate candy.
as she walked down the hall and noticed that her door was open. She walked into her classroom and
immediately
discovered that the small aquarium had been broken and her prized gold fish were gasping in the sink.
Beside the broken aquarium were the shattered remains of the pink piggy bank that had been on the shelf
above the aquarium. A can of blue paint was spilled on the floor. Footprints of a barefooted burglar led to
an open window. Bits of a white powdery substance were found next to
the broken, empty, piggy bank. The only other item found was a half-eaten large chunk of chocolate candy.
When the police arrived they immediately began to gather forensic evidence.Peg the Leg
Height: 5'
Alias: Lucky Lady
Peg is a librarian known for hanging horseshoes and four leaf clovers in her library. Employees say
she is so superstitious she insisted on carpeting in the library instead of laying tiles so she would not step on the cracks. She wraps construction zone tape around open ladders so no one can walk under them. Cola bottles litter her office, which she drinks with chocolate chunks. Her teeth are chipped from knocking the bottles against them. She is always throwing salt over her shoulder for good luck and keeps a salt shaker in her purse. Her alibi is that she was busy closing open umbrellas the morning of the crime. | |
Jake the Jock
Height 6'6"
Alias: Armchair Quarterback
Jake the Jock is known for quoting statistics on every sport from boomerang throwing to sled dogging. His neighbors report that he is the neighborhood
pitcher for baseball games. Last year a baseball hit him in the mouth and knocked out his front tooth. This has cramped his eating style of chocolate chunks, candied apples, and corn on the cob. His wife claims that on the morning of the crime Jake was rubbing his hands with cornstarch to keep them dry in preparation for an important baseball game. |
Dan the Man
|
Lou Lou
Height: 5'3"
Alias: Sweet Tooth
| |
Lou Lou is so addicted to sugar that she never leaves home without it. She loves to bake sweet things and has an entire pantry full of sugar bins. She claims to have been baking her famous chocolate chunk cookies the morning of the crime (although not a morsel of cookie or chocolate chunk was left when the police arrived.) Lou Lou rarely wears shoes, which often causes her to slip and break things, especially her collection of ceramic pigs.
| |
- Sticky, 'swirl' fingerprints were lifted from the aquarium and piggy bank.
- The painted footprints were measured and were for 26cm feet. ( size 8)
- The chunk of chocolate candy was collected for examination. It appeared there were teeth imprints.
- The white powdery substance by the piggy bank was carefully placed in a plastic bag and taken to the forensic chemist for identification . It had very small grains and when mixed with Iodine it reacted making the colour brown. It did not have a smell.
my thinkings/finding
name
|
evidence
|
clues
|
Peg the Leg
|
always throwing salt over her shoulder {white powder.}
|
there was a white powder in the crime scene
|
Jake the Jock
|
eating style of chocolate chunks. rubbing his hands with cornstarch [white powder
|
the was half eaten choc
|
Dan the Man
|
baking soda {white powder} and choc chunks are missing
| |
Lou Lou
|
rarely wears shoes, suger {white powder}
|
was barefoot
|
the bad guy is i think lou lou because suger turns black/brown she really wears shoes and has a sweet tooth
let me know what you think
Subscribe to:
Posts (Atom)